Github Desktop – A Really, Really Simple Tutorial
An introductory guide to the GitHub Desktop
This is the introductory part of a series of tutorials on GitHub Desktop.
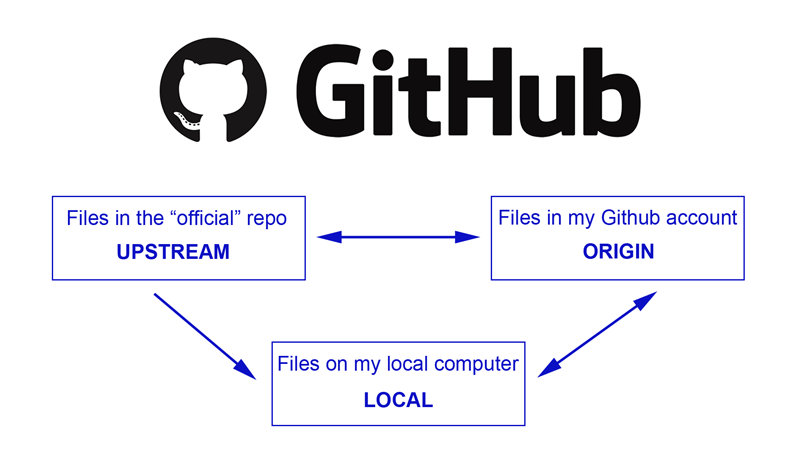
GitHub Desktop is a graphical tool that helps you to use GitHub without having to deal with the command line (which, let’s face it, does tend to discourage a lot of people). You could think of it as the umpire in a sort of complicated game of tennis involving three players, except they will be bouncing around files instead of tennis balls. Files get stored in a repository (repo for short) which is like a separate locker for each project. The repo also stores each file’s revision history.
The three players are:
- Upstream – the “official” project files that live on the main repo in GitHub,
- Origin – your fork of the project files that live in your GitHub account, and
- Local – the files on your local machine where you will be making your changes.
The objective of this tutorial is to show you how, using the GitHub Desktop, to contribute to an open source project by working on files from some remote repository and then submit them (make a pull request) so they can be merged into the “official” project. It is important to understand the interaction between the three players at all stages in this process. The diagram above will be used throughout this tutorial to illustrate the various exchanges. Boxes are shown in blue when they are synchronised with the current official repo; red means they have got out of sync; green is used when the upstream repo has been changed.
Note that each of the steps will get their own articles in the future as parts of this series.
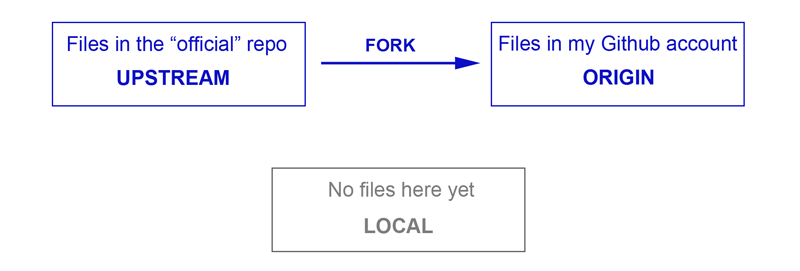
Step 1 – Fork the “official” files
See also: Longer post about Step 1 only
You obviously can’t work directly on the main project files, so you first need to take a copy of them to your own GitHub account. This is called a fork and it involves copying the files from the “official” repo (upstream) to your own account (origin).
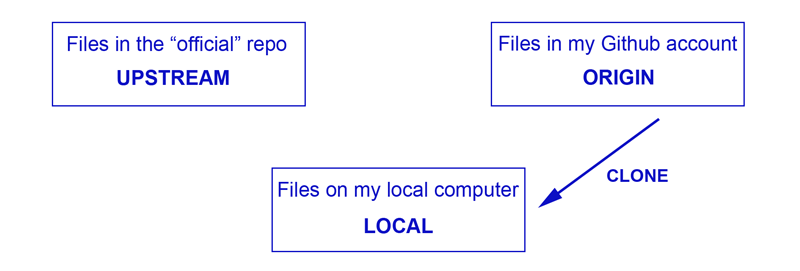
Step 2 – Clone the fork to your local computer with GitHub Desktop
See also: Longer post about Step 2 only
In order to work on the files easily, you will need to make another copy on your local machine. You can do this through GitHub Desktop by cloning the files from origin. Note that all players are still in sync.
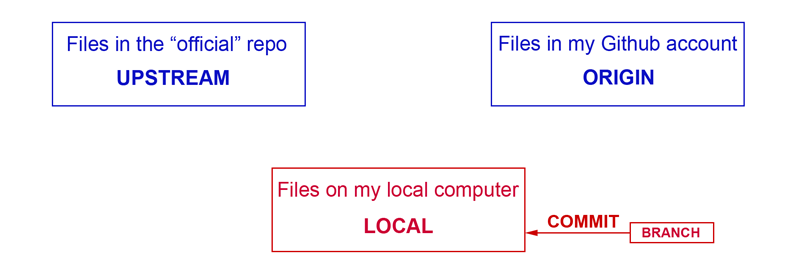
Step 3 – Create a branch, work on some files and commit the changes
See also: Longer post about Step 3 only
Now, it’s time to get to work and start making your changes to the file(s). You should do this in a branch; this keeps your workspaces separate and manageable. Once you have created a branch, make quite sure GitHub Desktop is showing it as your current active branch, then go in and start work. You can commit these as you go at any time. GitHub will keep track of everything and it’s easy to roll back to a previous commit. Your local files will now be out of sync with origin and upstream.
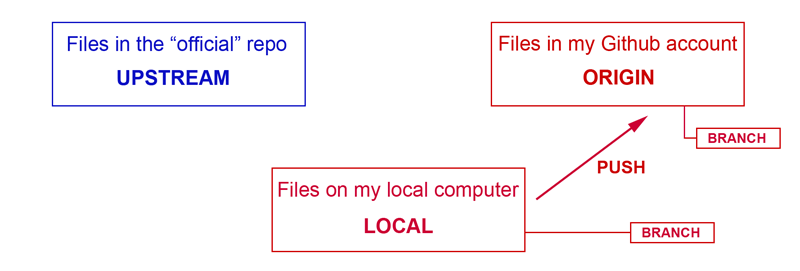
Step 4 – Publish your changes to origin when you are done
See also: Longer post about Step 4 only
When you are happy with the changes you’ve made, you can publish (push) them to your GitHub account. Now both local and origin will be different to upstream.
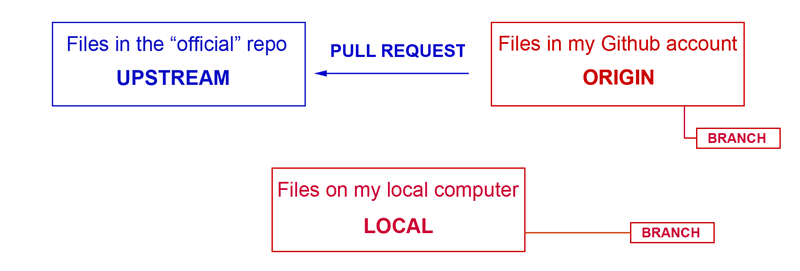
Step 5 – Create a pull request
See also: Longer post about Step 5 only
A pull request (PR) sends a message to the people who maintain the “official” repo, asking them to consider adding in your edits. There is probably a form template that you will need to use, to show you’ve followed the correct coding standards and done all the necessary tests. Maintainers may ask questions to clarify the changes, how they have been tested, or they may ask for some revisions. This process may take take a while because people are busy, but it’s acceptable to ping someone on your PR and ask them to take a look.
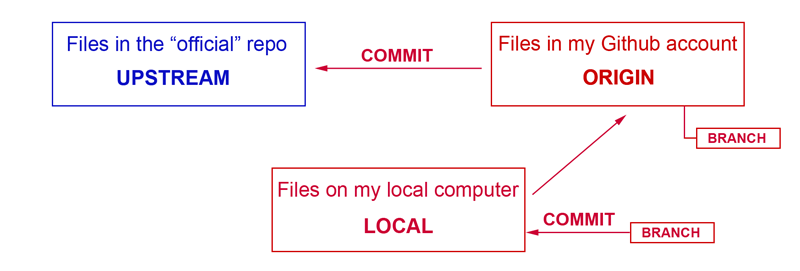
Step 6 – Make some revisions to your PR
See also: Longer post about Step 6 only
Sometimes you might find the need to make some extra changes to your initial pull request, or perhaps the maintainers of the “official” repo have suggested you make some revisions. It’s recommended NOT to open a new PR for this – just do another commit to your file(s) in local, push to origin, and your latest changes will automatically flow through to the existing PR on upstream.
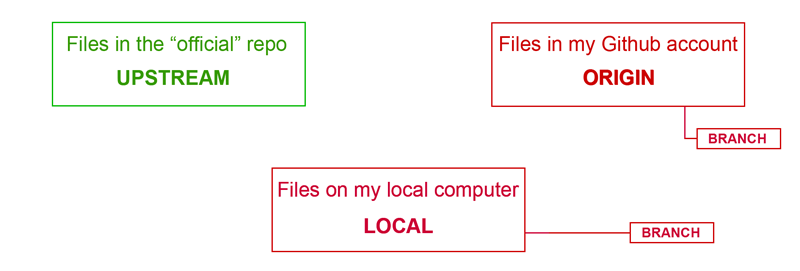
Step 7 – Wait for merge
See also: Longer post about Step 7 only
If all goes well, you will get a message to say that your edits have been approved and merged into the main project. Note that in the diagram below, you are still not in sync with the “official” repo. This is because your edited files still live in branches and your main (default) branch is now out of date. Other people may have been making changes to the upstream files as well.
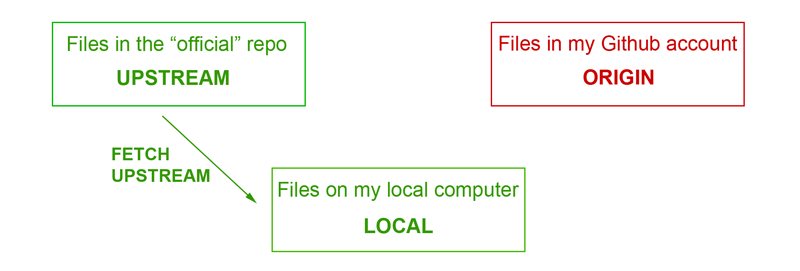
Step 8 – Fetch the new upstream files and merge into local
See also: Longer post about Step 8 only
You now need to update the files in your local computer to reflect the new “official” repo files. You do this by fetching the upstream files to local and merging them in with the files there (it’s a good idea to do this regularly, to keep up with all the changes). You can also delete the branch as this is no longer required.
Step 9 – Push the new files in local to origin
See also: Longer post about Step 9 only
Finally, you need to update the files in your GitHub repo by pushing the new files in local up to origin.
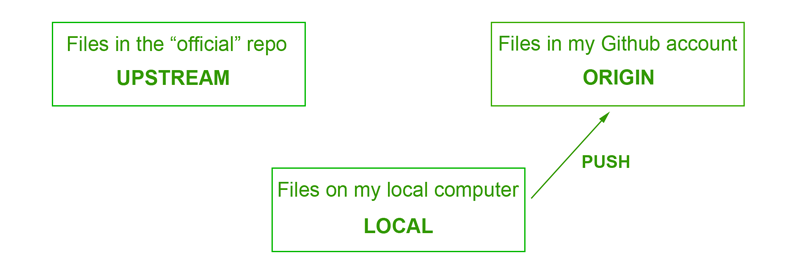
All players are now back in sync. Game, set and match!
Glossary
Branch – A branch is any set of code changes that has been given a unique name. It is a workspace created for a specific set of changes, and the name should describe the changes that are being made in that job.
Clone – Forked files live in your GitHub account (origin), but you work on them on your local machine. You can do this through GitHub by cloning the files from origin to local.
Fetch – This is the term used to describe downloading any changed files from a remote repository into your local repository. Note that after this process you still need to merge them into your own local files.
Fork – In order to work on remote files you first need to take a copy of them to your own GitHub account. This is called a fork and it involves copying the files from the “official” repo (upstream) to your own account (origin).
Local – The files on your local machine where you will be making your changes.
Merge – This is the process for combining different sets of changed files. You will be alerted if there are any conflicts that need to be resolved.
Origin – Your fork of the project files that live in your GitHub account.
Push – You push (or publish) files from your local machine to your GitHub repository.
Pull – This is the process that is used to fetch and download content from a remote repository and immediately update the local repository to match that content. So pull is a combination of fetch and merge.
Pull Request – A pull request (PR) sends a message to the people who maintain the “official” repo, asking them to consider adding in your edits.
Publish – see Push.
Repository – Files get stored in a repository (repo for short) which is like a separate locker for each project. The repo also stores each file’s revision history.
Upstream – The “official” project files that live on the main repo in GitHub.
About Alan Coggins
Alan builds and maintains websites. He thinks that computing is way too complicated for most people and enjoys finding simple and elegant ways to make things happen. His clients seem to appreciate this approach.
This is good stuff Alan. I already have those pages bookmarked!
I have now uploaded all the tutorial pages to the blog. So, there is the initial index page above, and 9 separate, more detailed pages for each of the steps.
Hopefully will be helpful for anyone wanting to contribute to CP or plugin development.